Cuju Start Guide
Cuju test execution environment
- If you just want to test Cuju, you can use this qemu disk image(cuju-diskQ-c.img) and follow the Setup document to setup qemu let it can execute this disk image
The environment prepare
- Assume you have already builded Primary, Backup and NFS node
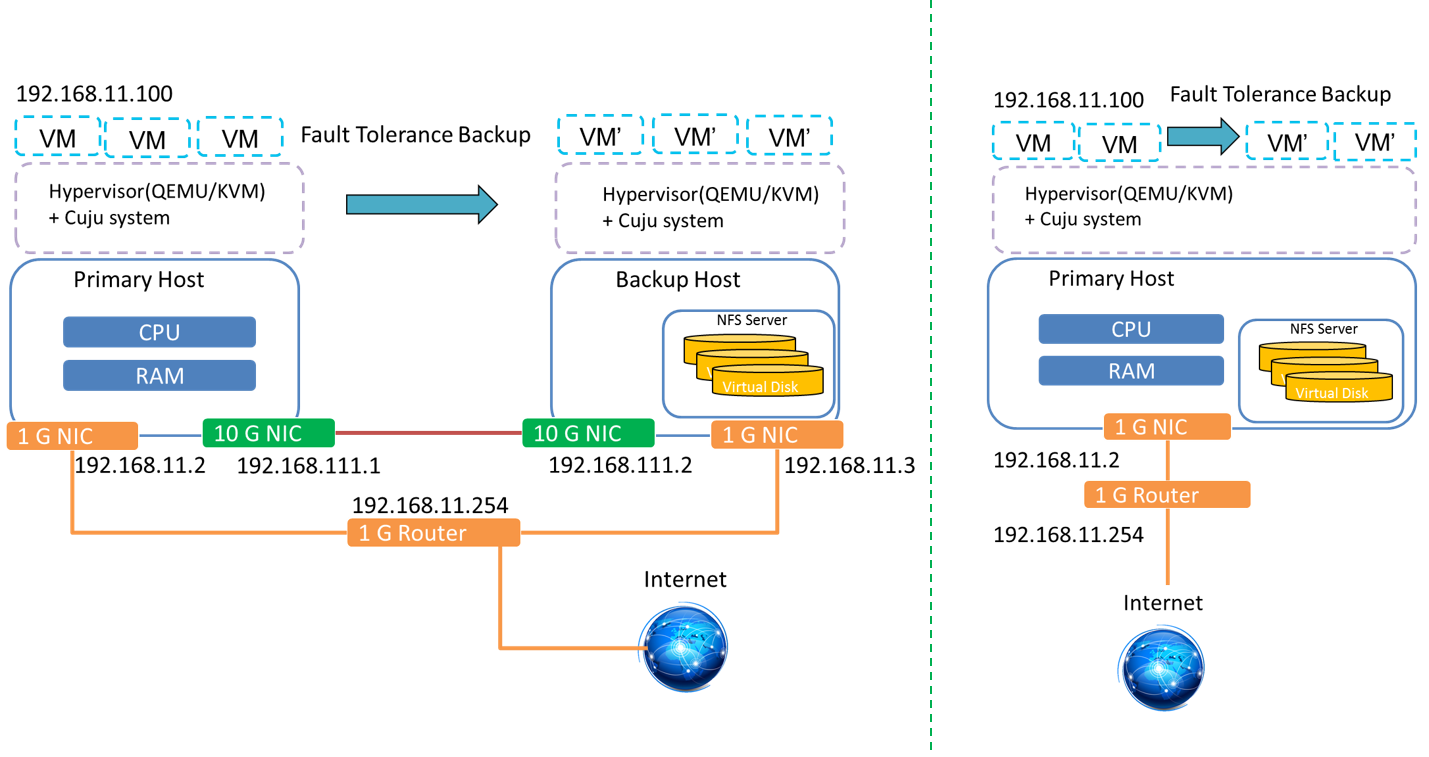
- A recommended topology
below:

- If you only have one or two machine, you can reference this setting
- Another recommended topology
below:

- Open the Intel virtualization support (VT-x) in your bios.
- Install OS in all nodes: Ubuntu-16.04-desktop-amd64.iso
- Install related packages in all nodes
 $ sudo apt-get update
 $ sudo apt-get install vim gcc make gdb fakeroot build-essential \
kernel-package libncurses5 libncurses5-dev zlib1g-dev \
libglib2.0-dev qemu xorg bridge-utils openvpn vncviewer \
libssl-dev libpixman-1-dev nfs-common
Set up the bridge and network environment
- You can follow our recommended topology to set up the network environment
- The example of network interfaces set up below (edit your /etc/network/interfaces):
#NFS node
auto lo
iface lo inet loopback

auto eth0
iface eth0 inet static
address 192.168.11.1
netmask 255.255.255.0
gateway 192.168.11.254
dns-nameservers 8.8.8.8
#Primary node
auto lo
iface lo inet loopback

auto br0
iface br0 inet static
bridge_ports eth0
bridge_maxwait 0
address 192.168.11.2
netmask 255.255.255.0
gateway 192.168.11.254
dns-nameservers 8.8.8.8

auto eth0
iface eth0 inet static
address 0.0.0.0

auto eth1
iface eth1 inet static
address 192.168.111.1
netmask 255.255.255.0
 #Backup node
auto lo
iface lo inet loopback

auto br0
iface br0 inet static
bridge_ports eth0
bridge_maxwait 0
address 192.168.11.3
netmask 255.255.255.0
gateway 192.168.11.254
dns-nameservers 8.8.8.8

auto eth0
iface eth0 inet static
address 0.0.0.0

auto eth1
iface eth1 inet static
address 192.168.111.2
netmask 255.255.255.0
- Build the high-speed connections with Primary and Backup nodes by the eth1
- After editing these network interfaces, type "/etc/init.d/networking restart" or reboot
Install the NFS service (Network FileSystem) in NFS node; then create a NFS forder placing the VM image
$ sudo apt-get install nfs-kernel-server
- Insert this line in "/etc/exports" to add your NFS forder:
/home/[your username]/nfsfolder *(rw,no_root_squash,no_subtree_check)
- After editing /etc/exports, type "/etc/init.d/nfs-kernel-server restart" or reboot
Install the NFS client in Primary and Backup nodes; then mount the NFS forder
 $ apt-get install nfs-common
 $ mount -t nfs 192.168.11.1:/home/[your username]/nfsfolder /home/[your username]/data
In NFS node, go to your nfs forder, then download
Cuju
and build a VM image file (or download our Ubuntu-16.04 VM image file, the account/password is root/root), they will be synced with Primary and Backup node.
Before launching your VM, you should update kvm module in Primary and Backup nodes:
#!/bin/sh
cd /your_work_path/Cuju/kvm
lsmod | grep kvm
sudo rmmod kvm_intel
sudo rmmod kvm
sudo modprobe irqbypass
sudo insmod ./x86/kvm.ko
sudo insmod ./x86/kvm-intel.ko
lsmod | grep kvm
Execute "reinsmodkvm.sh" before launching VM in Primary and Backup nodes
Cuju Compile and Execute


